Posts

Showing posts with the label UR10e

Data acquisition experiment

For the purpose of providing a reliable dataset for trainning our neural network, we invited several people to perform the physical interaction.   6 persons: 3 males + 3 females:   Margaça: 1,72m Peixinho: 1,86m Rosana: 1,70m Vlada: 1.69m Rúben: 1,78m Mafalda: 1,80m  Each one of them recorded every 4 movements (pull, push, shake, twist):   1st round: Vlada: 28, 28, 28, 32 = 116 Margaça: 59, 56, 56, 59 =230 Peixinho: 88, 83, 85, 89 = 345 Rosana: 117, 113, 117, 120 = 467 2st round:  Vlada: 151, 147, 151, 153 = 602 Margaça: 184, 180, 184, 186 = 734 Peixinho: 217, 212, 216, 220 = 865 Rosana: 233, 229, 232. 230 = 924 3st round: Rúben: 266, 262, 263, 264 = 1055 Mafalda : 299, 295, 296, 298 = 1188 Vlada: 333, 329, 327, 332 =1321 Margaça: 364, 361, 358, 364 = 1447 Peixinho: 395, 392, 390, 397 = 1574 Rosana: 443, 440, 438, 447 = 1768 4st round: Mafalda: 476, 470, 470, 480 = 1896 Rúben: 509, 503, 501, 513 = 2026 Vlada: 544, 539, 536, 547 = 2166 Margaça: 575, 570, 568, 57...
Physical interaction classification


Force-Torque real-time graphics

  The captured data is composed by: 3 Forces at the fist (3 axis) 3 Torques at the fist (3 axis) 6 Torques at the joints (6 joint efforts) 1 Current of gripper fingers This means that we can get 13 values of Force/Torque at each defined timestamp.

UR10e Force and Torque values

Image
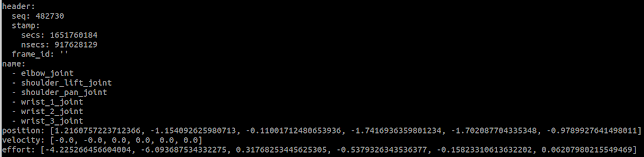
After launching everything (arm & gripper) as explained in some previous posts, I discover the following, regarding the UR10e force/torque values . rostopic echo /joint_states   header:   seq: 482730   stamp:     secs: 1651760184     nsecs: 917628129   frame_id: '' name:   - elbow_joint   - shoulder_lift_joint   - shoulder_pan_joint   - wrist_1_joint   - wrist_2_joint   - wrist_3_joint position: [1.2160757223712366, -1.154092625980713, -0.11001712480653936, -1.7416936359801234, -1.702087704335348, -0.9789927641498011] velocity: [-0.0, -0.0, 0.0, 0.0, 0.0, 0.0] effort : [-4.225266456604004, -6.093687534332275, 0.31768253445625305, -0.5379326343536377, -0.15823310613632202, 0.06207980215549469]   We can see on the documentation the following:   # This is a message that holds data to describe the state of a set of to...

RGB-D tracking + UR10e following & picking/placing

Image
Following the first use case described in this last post , the result of the experiment can be seen in this video: There are still several improvements to be made to this job1 task: The job should wait for the response of each controller before sending the next request The robot xacro should be extended to include every object that compose the real scenario  The procedure should have an interactive way of telling the robot that is time to pick up the object The use case should ensure that the object pick was successful (or not) This issues can be followed here .

Real-time UR10e following a tracked object

Image
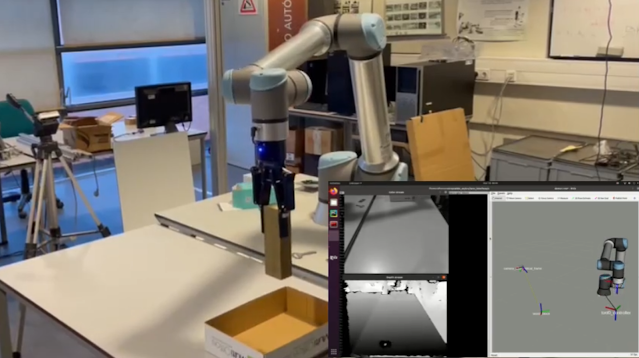
For a first trial, it was developed this demonstration of a real-time followed object that is being tracked using one RGB-D camera (Intel RealSense D435).   As seen in this previous post , ViSP is used to process the images acquired by the RealSense RGB-D camera and to continuously track the object . A TCP/IP Socket Connection is established (inside the same computer) between ViSP and ROS . This socket communication is responsible for bringing the geometric transformation between the camera and the object to the ROS environment. This previous post describes with more detailed information this connection. Besides the transformation between the camera and the object, it is also required to know the transformation between the robot and the camera . For the robot to understand the position and orientation of the object in reference to the robot himself, this transformation becomes crucial. For getting it, I performed a manual calibration , as described in this previous post . Fina...

TCP/IP connection: UR10e - External PC

Image
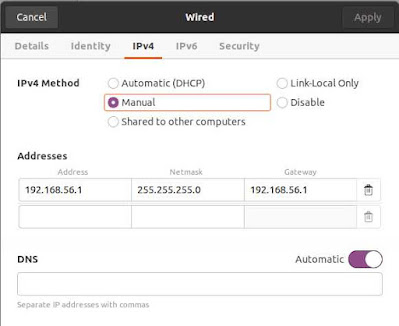
To use any of the features that have been published on my recent posts (UR10e external control, gripper external control, etc), it is required to have the cobot connected to my external computer.  For that an Ethernet cable is connected from the UR10e controller to my PC, using a TCP/IP communication protocol.  For enabling that communication, On UR10e Teach Pendant : Click on Menu (top right corner) + System + Network Configure: Network method : Static Address IP address: 192.168.56.2 Subnet mask: 255.255.255.0 Default gateway: 192.168.56.2   Click on Apply   Disable EtherNet/IP fieldbus: Installation > Fieldbus > EtherNet/IP > Disable   On External Computer :       After you connect the cable, you need to configure the IPv4 like this:

Gripper remote control

Image
I am working with a RobotIQ Gripper with 2 fingers of 140mm (2F- 140). This gripper is mounted on our UR10e collaborative robot, having its 8 pin DIN cable connected to the end of the robot arm. To control this gripper from an external computer (instead of using the robot Teach Pendant with the robotiq urcap installed), I established a RS485 communication with the tool. This communication is driven by the 54321 port , since this is the UR tool communication port ( tool_tcp_port ): https://forum.universal-robots.com/t/overview-of-used-ports-on-local-host/8889 The gripper remote control is enabled when: UR10e is turned on UR10e controller is connected to the external PC through an Ethernet cable (TCP/IP connection) - see this post UR10e can either be on Remote Control or in Local Control mode (does not make any difference) It is not required to launch any robot driver . The TCP/IP connection is enough, since the RS485 communication will be directly established between the gripper and ...

Remote Control of UR10e via MoveIt (ROS)

Image
Installation First, install the External Control URCap on the UR10e Teach Pendant. See this post , to further instructions. Then, you will need to install a few packages on your Ubuntu system: sudo apt install ros-noetic-moveit sudo apt-get install ros-noetic-industrial-robot-status-interface sudo apt-get install ros-noetic-scaled-controllers sudo apt-get install ros-noetic-pass-through-controllers sudo apt-get install ros-noetic-ur-client-library sudo apt-get install ros-noetic-velocity-controllers sudo apt-get install ros-noetic-force-torque-sensor-controller ( Note: At this moment, if you do not have a catkin workspace, you should now create one, by following the steps described here ) cd catkin_ws/src git clone https://github.com/afonsocastro/larcc_interface.git git clone https://github.com/ros-industrial/ur_msgs.git cd ~/catkin_ws catkin_make  Finally, to establish the communication between the robot and the computer, it is required to connect an Ethernet cable from the UR1...

Controlling UR10e: using Universal Robot driver (1st approach)

It is crucial to have a clean and working catkin workspace, that we can run cd ~/catkin_ws catkin_make without running into any trouble. I can remotely control the UR10e manipulator by following the instructions in  https://github.com/UniversalRobots/Universal_Robots_ROS_Driver : Just need to do, step-by-step, everything that is reported on the following ReadMe sections: Building (skip the Alternative: All-source build )  Setting up a UR robot for ur_robot_driver Prepare the robot Prepare the ROS PC   Extract Calibration Information Quick Start   By following those steps above, you will be able to use the rqt joint trajectory controller GUI, to remotely control the real robot!      

Installing External Control URCap on robot Teach Pendant

Image
For working on a real robot you need to install the externalcontrol-1.0.5.urcap which can be found inside the resources folder of this repository . Using a USB pen drive, follow: Format the flash drive Download and save the externalcontrol-1.0.5.urcap on the USB pen drive Insert the USB drive on UR10e controller (the controller has two USB ports)        4. Turn on the Teach Pendant      Click on Menu (top right corner) + System + URCaps + Select External Control and press "+"        6.  Configure the remote host's IP to 192.168.56.1 Click on Menu (top right corner) + System + Network Configure: Network method : Static Address IP address: 192.168.56.2 Subnet mask: 255.255.255.0 Default gateway: 192.168.56.2 Click on Apply    10. Disable EtherNet/IP fieldbus: Installation > Fieldbus > EtherNet/IP > Disable